Low-Level Development on Retail Android Hardware - Reconnaissance and Prototyping a Bootloader
Many months ago, a slightly younger Tim thought that porting mainline Linux to his old Android phone for the purpose of experimentation would be a great way to pass time. (In hindsight it was, but not for the reasons imagined.)
However, the device in question is a Samsung Galaxy Core Plus (codenamed cs02), an obscure device from 2013
that uses an obscure Broadcom SoC (System-on-Chip) from 2012, the Broadcom BCM21664. While
the upstream Linux kernel already has basic support for this processor
(and a few related boards), actually getting it to run was still going to be quite an effort.
Additionally, this was worsened by a lack of feedback from the actual device when testing, and (later on) by a very long flash-and-test cycle as fastboot isn’t usually available on Samsung devices. Surely, writing a bootloader can’t be that hard, right?
Note: This is a recapitulation of events that happened over the last two years. The contents have been shortened to follow the bootloader instead of most of my other unrelated detours.
Note: It has been an additional two years since I started writing this blog post, in particular the introduction. Just so you know what the timeline is like.
Communicating via UART
Even though the device (and many other Samsung devices) does not have any obvious contacts for it, it is still able to communicate with external devices via UART by the use of a built-in USB multiplexer. The multiplexer checks whether there is a connected resistor between the GND and ID pins of the micro-USB plug, and changes the mode of operation depending on its value. All of this was already figured out by members of the XDA forums back in 2010, so all I had to do was to build a few cables figure out which resistor works and which one doesn’t.
By trial-and-error, I ended up soldering three cables with 150k Ohm, 523k Ohm and 619k Ohm resistors respectively. The latter two automatically power on the device when connected, but don’t seem to have any (relevant) difference in functionality.
With a quick dive into the Samsung-provided kernel source (or by looking at /proc/cmdline on a
running device), we can determine that the UART connection should be using the 115200n8 setting
(which translates to 115200 baud, no parity bit, 8 data bits) by default. Note that
the UART connection could be reconfigured at any time by the bootloader or kernel (i.e. the configuration
that the bootloader uses doesn’t have to match the kernel), but I decided to just try it anyways.
When retrieving data via UART with the specified setting while the device boots, we get the following:
$ screen /dev/ttyUSB0 115200n8
�AST_POWERON
Uncompressing Linux... done, booting the kernel.
Great, now we are getting some kind of feedback from the device!
Note: For brevity, we skip ahead to after we tried to make do with the kernel console alone and decided that having to switch between USB and UART each time for reflashing the device is not particularly comfortable.
Loading S-BOOT into Ghidra
First of all, we need to determine which binary is currently running when the existing log messages get
printed, and whether we have access to them. The Uncompressing Linux message originates from the kernel itself,
which is too late for us to be relevant. This means that AST_POWERON is the only string that we can currently
look for.
When grepping for it in the G350XXUANB1 stock ROM package, we find the following:
$ grep "AST_POWERON" *
grep: sboot.bin: binary file matches
However, when loading the binary into Ghidra and analyzing it, the result isn’t immediately usable.
Since we are working with a raw binary that (unfortunately) isn’t position-independent, there is no
information in the file itself on where the data is expected to be loaded into memory. Therefore,
the memory map places it at 0x00000000 by default, which doesn’t match up with the memory offsets
that the executable code references. To fix this, we will have to find out where the binary expects
to be loaded.
The strongest hint that I have found seems to be a switch table that references absolute addresses:
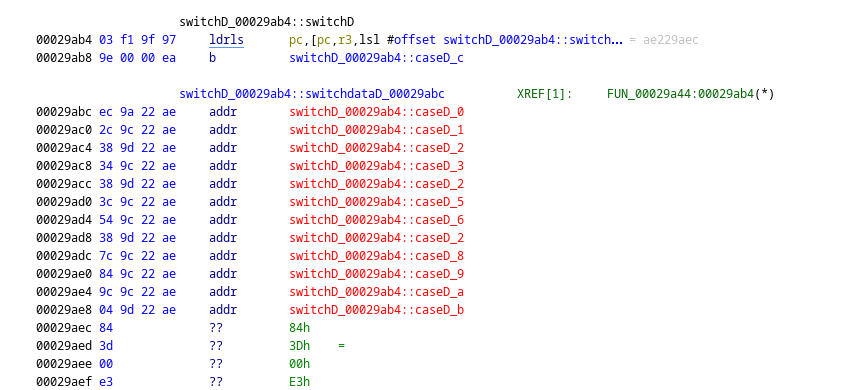
Looking at the first entry (0x00029abc), its bytes ec 9a 22 ae result in the address 0xae229aec
when read in little-endian byte order. As this matches up with the first address after the table (0x00029aec),
it is quite likely that this is what that entry refers to, resulting in a mapping offset of 0xae200000 for the
sboot.bin binary.
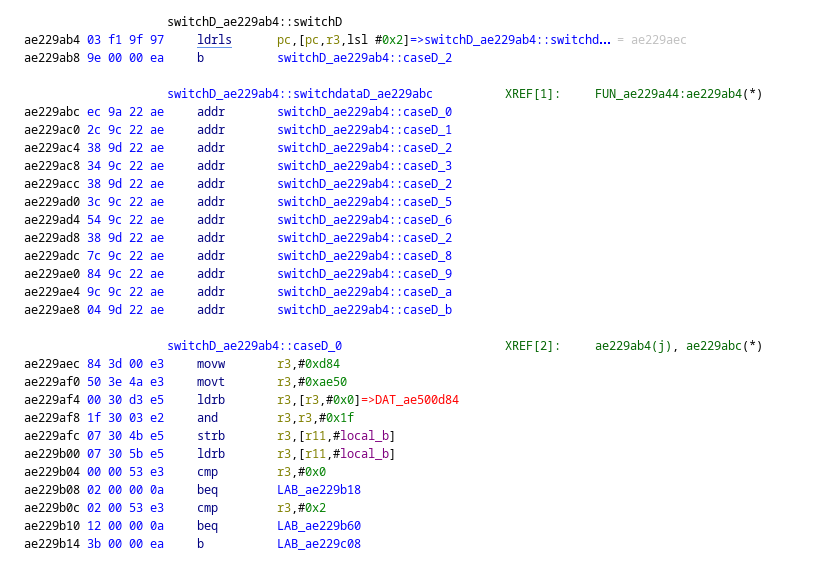
After importing the binary with the correct base address, analyzing the binary gets much further and string references resolve properly. The switch table that we used for determining the address also looks proper now:
Getting more output from S-BOOT
Now, the limited output that we have gotten is unlikely to be all of what the bootloader can provide us. However, to get to the bottom of this, we will actually have to start reverse engineering, as the bootloader doesn’t want to give us that information voluntarily.
This is something that I took a look at together with santeri3700, another frequent contributor to this family of devices (who got stuck at roughly the same spot that I did).
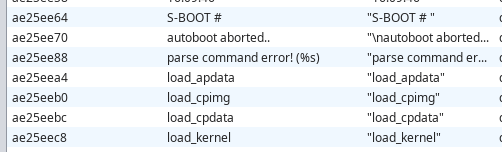
When looking through the list of strings, it became apparent that S-BOOT seems to have an autoboot feature that can be aborted and some sort of a command system:
Later, we figured out that the device stops its booting process when repeatedly pressing the Enter key during early boot.
While there was still no sign of any kind of additional output, we found that typing reset and pressing Enter reboots
the device, which indicates some form of a functional command line interface.
Continuing to dig through the list of adjacent strings, there also is a log command, which prints all previous log output
to the console and allowed us to continue exploring S-BOOT. From now on, extracts from the command line interface will show
their in- and outputs in an interlaced format (i.e. command inputs will be shown between the command outputs, similar to a
standard terminal), even though in reality they will only show their output asynchronously after running log.
S-BOOT # help
Following commands are supported:
* help
* log
* reset
* boot
* load_kernel
* printenv
* setenv
* saveenv
* findenv
* checksum_need
* usb
* upload
* keyread
* load_cpimg
* load_cpdata
* load_apdata
* bootmodem
To get commands help, Type "help <command>"
S-BOOT # printenv
: REBOOT_MODE: 0
: SWITCH_SEL: 1
: DEBUG_LEVEL: 20300
: KERNEL_LOG_LEVEL: 17484
: SUD_MODE: 0
: DN_ERROR: 0
: CHECKSUM: 3
: INT_RSVD6: 0
: INT_RSVD7: 0
: INT_RSVD8: 0
: INT_RSVD9: 0
: CMDLINE: console=ttyS2,115200n8 mem=738M cma0=0M carveout0=0M vmalloc=136M androidboot.console=ttyS2 logbuf_nocache=1
: STR_RSVD1: (null)
: STR_RSVD2: (null)
Automatically printing S-BOOT output
Having to run log after every command isn’t particularly usable, and it won’t have an effect at all if we don’t boot into the
interactive command line to begin with. Therefore, we would want to look into enabling logging output by default, and the best
starting point seems to be a LOG DISABLE! line that gets printed during early boot.
When looking for usages of this string, we can find the following code:
iVar1 = FUN_ae20dd10(3);
if (iVar1 == 0x454c) {
  FUN_ae202bb4(1);
  FUN_ae203534(s_LOG_ENABLE!_ae2608dc);
}
else {
  FUN_ae203534(s_LOG_DISABLE!_ae2608ec);
  FUN_ae202bb4(0);
}
After digging through the decompiled code quite a bit, this eventually turns into the following:
iVar2 = _env_get(KERNEL_LOG_LEVEL);
if (iVar2 == 17740) {
  _log_set_enabled(1);
  _log_message("LOG ENABLE!\n");
}
else {
  _log_message("LOG DISABLE!\n");
  _log_set_enabled(0);
}
This looks promising (although I have no idea what 17740 is supposed to be), so let’s try and put it into practice:
S-BOOT # setenv KERNEL_LOG_LEVEL 17740
argv[0]: setenv
argv[1]: KERNEL_LOG_LEVEL
argv[2]: 17740
S-BOOT # saveenv
Note that saveenv is required, otherwise the changed environment variables only get stored in memory and not to the flash storage,
resulting in the changes being lost when rebooting.
If we reset the device now, S-BOOT will start printing log messages immediately upon boot:
$ screen /dev/ttyUSB0 115200n8
LOG ENABLE!
RTC-Info(2) : (Year-Month-Day-Weekday-Hour-Min-Sec)(23-5-29-6-23-32-36)
hw_lcd_init
MM clock enable...
Init DSI...
[...]
This way of enabling logging output has since been recorded on the postmarketOS wiki page for the Samsung Galaxy Core Plus.
Examining the boot flow
Unfortunately, all of this hasn’t brought us any closer to a useable way of uploading code, so we’ll have to start writing
our own loader now. To figure out the format that our binary has to be in, we need to look at the (heavily cleaned up) implementation of the
load_kernel and boot S-BOOT commands (which are also used during the automatic boot sequence):
undefined4 load_kernel(void)
{
  boot_img_hdr_v0 abStack_27c [13];
  boot_img_hdr_v0 *bootimage_header;
  pit_entry *partition;

  bootimage_header = abStack_27c;
  if ((_DAT_ae2a0044 & 0x80000) == 0) {
    partition = _find_pit_entry_by_name("KERNEL");
  }
  else {
    partition = _find_pit_entry_by_name("RECOVERY");
  }
  if (partition == nullptr) {
    _log_message("Could not do normal boot. (invalid ppi), Please Enter download mode and download pit\n");
    return -1;
  }
  else {
    uint start_block_of_bootimage = partition->blockSizeOrOffset;
    _log_message("%s: loading boot image from %x..\n", "load_kernel", start_block_of_bootimage * 512);
    _mmc_read(bootimage_header, start_block_of_bootimage, 0x260);
    int bootimage_size = ((bootimage_header->kernel_size - 1 >> 0xc) + 1) * 0x1000 +
                         ((bootimage_header->ramdisk_size - 1 >> 0xc) + 1) * 0x1000 + 0x1000;
    if (_memcmp(bootimage_header, "ANDROID!", 8) == 0) {
      _mmc_read((void *)0x81e07000, start_block_of_bootimage, bootimage_size + 0x100);
      // [snip] Some signature validation.
      memcpy((undefined *)0x83000000,
             &_kernel_entry + ((bootimage_header->kernel_size - 1 >> 0xc) + 1) * 0x1000,
             bootimage_header->ramdisk_size);
      _DAT_ae2a003c = bootimage_header->ramdisk_size;
    }
    else {
      _mmc_read(&_kernel_entry, start_block_of_bootimage, 0x800000);
    }
  }
  return 0;
}
Note: load_kernel appears to have support for boot images without magic,
but those already seem to get rejected during flashing.
void _handle_cmd_boot(void)
{
  undefined4 uVar1;
  uint uVar2;

  setKernelParam();
  FUN_ae21a980(8);
  _log_message("\nStarting kernel at 0x%x...\n\n", _kernel_entry_address);
  uVar2 = coproc_movefrom_Control();
  coproc_moveto_Control(uVar2 & 0xfffffffe);
  uVar1 = _env_get(SWITCH_SEL);
  FUN_ae201010(uVar1);
  (*(code *)_kernel_entry_address)(0, _DAT_ae2a0024, _DAT_ae2a0028);
  do {
  } while( true );
}
In short, S-BOOT loads the kernel part of the bootimage at the kernel entry address
(0x81e08000) and jumps pretty much directly into it afterwards.
Creating the first executable
For building the executable, I decided on using the arm-none-eabi- toolchain provided by Arch Linux.
However, given the low complexity, probably any toolchain works as long as it is compatible with a Cortex-A9.
For the first test, I decided to just print something simple via UART to see if our code will run. Since I don’t want to spend time reimplementing hardware access just for a prototype, I ended up lifting various function pointers from the S-BOOT binary instead.
void _start() {
    void (*_uart_write_character)(unsigned int) = (void*)0xae2145f8;

    _uart_write_character('H');
    _uart_write_character('e');
    _uart_write_character('l');
    _uart_write_character('l');
    _uart_write_character('o');

    do {
    } while (1);
}
After compiling into an object file, we also make sure to copy the contents into a raw binary and to look at the disassembly:
$ arm-none-eabi-gcc -c bootloader.c
$ arm-none-eabi-objcopy -O binary -j .text bootloader.o bootloader
$ arm-none-eabi-objdump -m arm -b binary -D bootloader
[...]
00000000 <.data>:
   0:	e92d4800 	push	{fp, lr}
   4:	e28db004 	add	fp, sp, #4
   8:	e24dd008 	sub	sp, sp, #8
   c:	e59f3054 	ldr	r3, [pc, #84]	@ 0x68
  10:	e50b3008 	str	r3, [fp, #-8]
  14:	e51b3008 	ldr	r3, [fp, #-8]
  18:	e3a00048 	mov	r0, #72	@ 0x48
  1c:	e1a0e00f 	mov	lr, pc
  20:	e12fff13 	bx	r3
  24:	e51b3008 	ldr	r3, [fp, #-8]
  28:	e3a00065 	mov	r0, #101	@ 0x65
  2c:	e1a0e00f 	mov	lr, pc
  30:	e12fff13 	bx	r3
  34:	e51b3008 	ldr	r3, [fp, #-8]
  38:	e3a0006c 	mov	r0, #108	@ 0x6c
  3c:	e1a0e00f 	mov	lr, pc
  40:	e12fff13 	bx	r3
  44:	e51b3008 	ldr	r3, [fp, #-8]
  48:	e3a0006c 	mov	r0, #108	@ 0x6c
  4c:	e1a0e00f 	mov	lr, pc
  50:	e12fff13 	bx	r3
  54:	e51b3008 	ldr	r3, [fp, #-8]
  58:	e3a0006f 	mov	r0, #111	@ 0x6f
  5c:	e1a0e00f 	mov	lr, pc
  60:	e12fff13 	bx	r3
  64:	eafffffe 	b	0x64
  68:	ae2145f8 	mcrge	5, 1, r4, cr1, cr8, {7}
Other than the weird instruction at the very bottom (which is just our function pointer interpreted as an instruction) this looks very reasonable, so let’s see what we get if we flash it to the device:
$ truncate -s 4096 ramdisk
$ mkbootimg --kernel bootloader --ramdisk ramdisk --pagesize 4096 -o bootloader.img
$ heimdall flash --KERNEL bootloader.img
[...]
$ screen /dev/ttyUSB0 115200n8
[...]

Starting kernel at 0x81e08000...

Hello
Looks like our code is running successfully!
Loading and booting
Next, we’ll actually take a shot at transferring and booting a kernel. In theory that is easy, one just needs to read data and jump to it, but there are some details to work out.
The first is the loading address, since we need to find a location where we can place the loaded data.
Ideally, we would load the binary at the same address where S-BOOT would load it, but self-relocation is somewhat out
of scope for our prototype. Luckily, the Linux kernel is rather lax regarding what address it expects to be loaded at,
so we can pick pretty much any address that we want. Prime candidates are addresses that we know are unused,
such as the location where our ramdisk would be (0x83000000).
In addition to that, we also can’t just dump the raw data onto the serial port and expect the device to know what to do with it, we need something for the device to recognize the beginning and end of a transfer. In this case we can keep it pretty simple and just send a recognizable start byte, the length of the data, the data itself, and a reply to the host to signal that the transfer was received.
The stub program for the device ends up being quite simple, with more lifted function pointers and the avoidance of
depending on anything but the .text section representing the most interesting part. In particular, symbols such as
global variables and string constants would be placed in the data sections of the output executable, which are not
copied to the final binary by our crude build process, nor would any references to said data (or function calls)
be linked properly.
void _start() {
    void (*_uart_write_character)(unsigned int) = (void*)0xae2145f8;
    unsigned int (*_uart_read_character)(void) = (void*)0xae2145b0;
    int (*_uart_ready_for_read)(void) = (void*)0xae214574;
    unsigned int (*_sleep)(unsigned int) = (void*)0xae2048e8;

    _uart_write_character('S');
    _uart_write_character('T');
    _uart_write_character('U');
    _uart_write_character('B');

    unsigned int transfer_size = 0;
    unsigned char* transfer_size_ptr = (void*)&transfer_size;
    for (int i = 0; i < sizeof(transfer_size); i++) {
        while (!_uart_ready_for_read())
            _sleep(50);

        transfer_size_ptr[i] = _uart_read_character();
    }

    _uart_write_character('S');
    _uart_write_character('T');
    _uart_write_character('A');
    _uart_write_character('R');
    _uart_write_character('T');

    void (*entrypoint)(void) = (void*)0x83000000;
    unsigned char* payload = (void*)entrypoint;

    for (unsigned int i = 0; i < transfer_size; i++) {
        while (!_uart_ready_for_read())
            _sleep(50);

        payload[i] = _uart_read_character();
    }

    _uart_write_character('B');
    _uart_write_character('O');
    _uart_write_character('O');
    _uart_write_character('T');

    entrypoint();

    do {
    } while (1);
}
On the host, the sender program handles loading the file into memory and organizes the transfer of data to the
device. Integral to the purpose is the function call to cfmakeraw, which reconfigures the terminal (i.e., serial)
settings to ignore any bytes that may have a special meaning in this context. We don’t want any control codes to work,
we just want to transfer the bytes exactly as we send them.
#include <fcntl.h>
#include <limits.h>
#include <stdio.h>
#include <stdlib.h>
#include <termios.h>
#include <time.h>
#include <unistd.h>

int main(int argc, char** argv) {
    if (argc < 3) {
        fprintf(stderr, "error: program requires a serial device and an input file\n");
        exit(1);
    }

    char* device_path = argv[1];
    char* payload_path = argv[2];

    int payload_fd = open(payload_path, O_RDONLY);
    if (payload_fd < 0) {
        perror("payload open");
        exit(1);
    }

    size_t payload_size = lseek(payload_fd, 0, SEEK_END);
    lseek(payload_fd, 0, SEEK_SET);

    if (payload_size > UINT_MAX) {
        fprintf(stderr, "error: payload too large to handle\n");
        exit(1);
    }

    unsigned char* payload = malloc(payload_size);
    if (!payload) {
        perror("malloc");
        exit(1);
    }
    size_t read_offset = 0;
    while (read_offset < payload_size) {
        int nread = read(payload_fd, payload + read_offset, payload_size - read_offset);
        read_offset += nread;
    }

    int device_fd = open(device_path, O_RDWR);
    if (device_fd < 0) {
        perror("device open");
        exit(1);
    }

    struct termios term = {};
    if (tcgetattr(device_fd, &term) != 0) {
        perror("tcgetattr");
        exit(1);
    }
    cfmakeraw(&term);
    cfsetspeed(&term, B115200);
    if (tcsetattr(device_fd, TCSANOW, &term) != 0) {
        perror("tcsetattr");
        exit(1);
    }
    if (tcflush(device_fd, TCIOFLUSH) != 0) {
        perror("tcflush");
        exit(1);
    }

    unsigned int payload_size_32 = payload_size;
    write(device_fd, &payload_size_32, sizeof(payload_size_32));

    char start[5];
    int nread = read(device_fd, &start, sizeof(start));
    if (nread != sizeof(start)) {
        fprintf(stderr, "error: failed to read start signal\n");
        exit(1);
    }

    if (start[0] != 'S' || start[1] != 'T' || start[2] != 'A' || start[3] != 'R' || start[4] != 'T') {
        fprintf(stderr, "error: start signal was wrong\n");
        exit(1);
    }

    printf("Started transfer.\n");

    unsigned long time_start = time(NULL);

    size_t payload_offset = 0;
    while (payload_offset < payload_size) {
        int nwrite = write(device_fd, payload + payload_offset, payload_size - payload_offset);
        payload_offset += nwrite;
    }

    printf("Finished enqueueing data.\n");

    char boot[4];
    nread = read(device_fd, &boot, sizeof(boot));
    if (nread != sizeof(boot)) {
        fprintf(stderr, "error: failed to read end signal\n");
        exit(1);
    }

    if (boot[0] != 'B' || boot[1] != 'O' || boot[2] != 'O' || boot[3] != 'T') {
        fprintf(stderr, "error: end signal was wrong\n");
        exit(1);
    }

    unsigned long time_end = time(NULL);

    printf("Transferred %lu bytes in %lu seconds.\n", payload_size, time_end - time_start);

    while (1) {
        char buffer[256];
        int nread = read(device_fd, &buffer, sizeof(buffer));
        write(STDOUT_FILENO, &buffer, nread);
    }
}
With the program finished, I flashed the bootloader to the device and tested the transfer with a small binary.
$ ./sender /dev/ttyUSB0 4096_zeroes
Started transfer.
Finished enqueueing data.
Other than that, nothing. The transfer never finishes by reading the end signal, and the activity LED on my UART adapter only flashes for a split second. Who would have thought that writing the whole program in one go without testing isn’t a good idea?
Poor man’s flow control
Acting out the whole process in a binary-capable serial terminal (in this case pyserials miniterm, as it allows
for hexadecimal input via --encoding hexlify) shows no apparent issues, so the next likely culprit is the speed
at which we transfer the data. While the underlying UART controller (a Synopsys DesignWare ABP UART) implements
hardware-based flow control, the required CTS/RTS signals are not exposed via the USB connector. Software-based
flow control is also not an option, as we need to use the representation of the VSTART and VSTOP symbols for our
transferred data, and the S-BOOT UART implementation does not have it implemented anyways. This essentially means
that we need to implement our own version of flow control.
Looking at the UART controller datasheet, the list of features
implies that the OEM can choose to have a FIFO queue configured into the hardware. We don’t officially know whether
Samsung included this with their variation of the controller, but the UART initialization code in S-BOOT shows that
bit 0 in the FCR register (“FIFO Control Register”) is being set, so this is an indicator that the feature is supported.
Unfortunately, there exists no immediate configuration value that can be used to read the size of the FIFO queue,
as this is determined via hardware anyways. However, for purposes of implementing software-based flow control,
a register titled RFL (“Receive FIFO Level”) informs about the current fill level of the receive queue.
This means that we can hopefully just write a program that periodically prints the value of this register,
and then fill up the queue manually to see when the counter stops.
void _start() {
    void (*_uart_write_character)(unsigned int) = (void*)0xae2145f8;
    unsigned int (*_sleep)(unsigned int) = (void*)0xae2048e8;

    void* uartb3_base = (void*)0x3e002000;
    unsigned int volatile* uartb3_rfl = uartb3_base + 0x84;

    while (1) {
      _sleep(1000);
      unsigned int current_rfl = *uartb3_rfl;

      // This will be looked at as a hexdump, might as well make it big endian for easy reading.
      _uart_write_character(current_rfl >> 24);
      _uart_write_character(current_rfl >> 16);
      _uart_write_character(current_rfl >> 8);
      _uart_write_character(current_rfl >> 0);
    }
}
After flashing the program to the device and holding 0 for a while, I got the following (slightly cleaned up) output:
00 00 00 00
00 00 00 00
00 00 00 00
00 00 00 00
00 00 00 00
00 00 00 01
00 00 00 03
00 00 00 0F
00 00 00 1B
00 00 00 27
00 00 00 33
00 00 00 40
00 00 00 4C
00 00 00 58
00 00 00 64
00 00 00 70
00 00 00 7D
00 00 00 89
00 00 00 95
00 00 00 A1
00 00 00 AE
00 00 00 BA
00 00 00 C6
00 00 00 D2
00 00 00 DE
00 00 00 EB
00 00 00 F7
00 00 01 00
00 00 01 00
00 00 01 00
This confirms that we have an internal FIFO receive queue with size 256. With this piece of information, we can now return to implementing a variant of flow control into the stub bootloader. As the UART controller can store up to 256 bytes of data, it should suffice to present a signal every 256 processed bytes that the host can wait on.
--- a/bootloader.c
+++ b/bootloader.c
@@ -32,6 +32,9 @@
             _sleep(50);

         payload[i] = _uart_read_character();
+
+        if (i % 256 == 0)
+            _uart_write_character(payload[i]);
     }

     _uart_write_character('B');
--- a/sender.c
+++ b/sender.c
@@ -83,7 +84,15 @@

     size_t payload_offset = 0;
     while (payload_offset < payload_size) {
-        int nwrite = write(device_fd, payload + payload_offset, payload_size - payload_offset);
+        size_t until_256 = 256 - payload_offset % 256;
+        size_t to_transfer = MIN(until_256, payload_size - payload_offset);
+        int nwrite = write(device_fd, payload + payload_offset, to_transfer);
+        if (until_256 == 256) {
+            unsigned char echo;
+            read(device_fd, &echo, 1);
+            if (echo != *(payload + payload_offset))
+                fprintf(stderr, "error: Transfer error at offset %lu, expected '0x%hhx', got '0x%hhx'\n", payload_offset, *(payload + payload_offset), echo);
+        }
         payload_offset += nwrite;
     }
Now, trying to transfer a file with a random sequence of bytes in it yields the following:
$ ./sender /dev/ttyUSB0 4096_random
Started transfer.
Finished enqueueing data.
Transferred 4096 bytes in 1 seconds.
Hello World!
Now, this does not guarantee yet that our bootloader actually boots into the transferred payload. For this, I built a basic Linux kernel with appended DTB and transferred it to the device:
$ ./sender /dev/ttyUSB0 zImage-dtb
Started transfer.
Finished enqueueing data.
Transferred 1462360 bytes in 281 seconds.
Zone ranges:
  Normal   [mem 0x0000000080000000-0x00000000adffffff]
Movable zone start for each node
Early memory node ranges
  node   0: [mem 0x0000000080000000-0x00000000adffffff]
Initmem setup node 0 [mem 0x0000000080000000-0x00000000adffffff]
[...]
No filesystem could mount root, tried:

Kernel panic - not syncing: VFS: Unable to mount root fs on unknown-block(0,0)
CPU: 0 PID: 1 Comm: swapper Tainted: G        W         5.10.0-gcf5bf2854cf5-dirty #1
Hardware name: BCM21664 Broadcom Application Processor
[<c0105610>] (unwind_backtrace) from [<c01043b8>] (show_stack+0x10/0x14)
[<c01043b8>] (show_stack) from [<c031602c>] (panic+0xf8/0x2d8)
[<c031602c>] (panic) from [<c0501630>] (mount_block_root+0x3d4/0x3e0)
[<c0501630>] (mount_block_root) from [<c05017f8>] (prepare_namespace+0x144/0x17c)
[<c05017f8>] (prepare_namespace) from [<c0318928>] (kernel_init+0x8/0x114)
[<c0318928>] (kernel_init) from [<c0100148>] (ret_from_fork+0x14/0x2c)
Exception stack(0xc086bfb0 to 0xc086bff8)
bfa0:                                     00000000 00000000 00000000 00000000
bfc0: 00000000 00000000 00000000 00000000 00000000 00000000 00000000 00000000
bfe0: 00000000 00000000 00000000 00000000 00000013 00000000
---[ end Kernel panic - not syncing: VFS: Unable to mount root fs on unknown-block(0,0) ]---
Not sure where the Linux kernel banner (which is supposed to be at the very beginning) went, but it’s probably still recognizable that something is happening.
What’s next?
Obviously, a data transfer rate of about 5 kilobytes per second is not really usable either, in that time one could assemble and flash a bootimage twice. However, given that this is a prototype, ending the first blog post of the series at the proof-of-concept stage seemed appropriate. Notably, it is not without use either, as chainloading itself or another smaller binary is still reasonably fast.
Now that the baseline is established, future improvements could include the following:
- Migration to a reasonable build process (and maybe Rust?)
- Direct interfacing with the UART controller and other hardware
- Switching from UART to USB as the transport medium
- Just porting U-Boot instead of rolling my own bootloader
If any of these rough targets (or anything else related to the topic) sound interesting, then I recommend staying updated by means of RSS, Mastodon, the platform formerly known as Twitter, or any other platform where I could announce blog posts (suggestions welcome).
It may take a few months for the next installation, but I’m sure it will be worth the wait (and it won’t be too noisy until then).
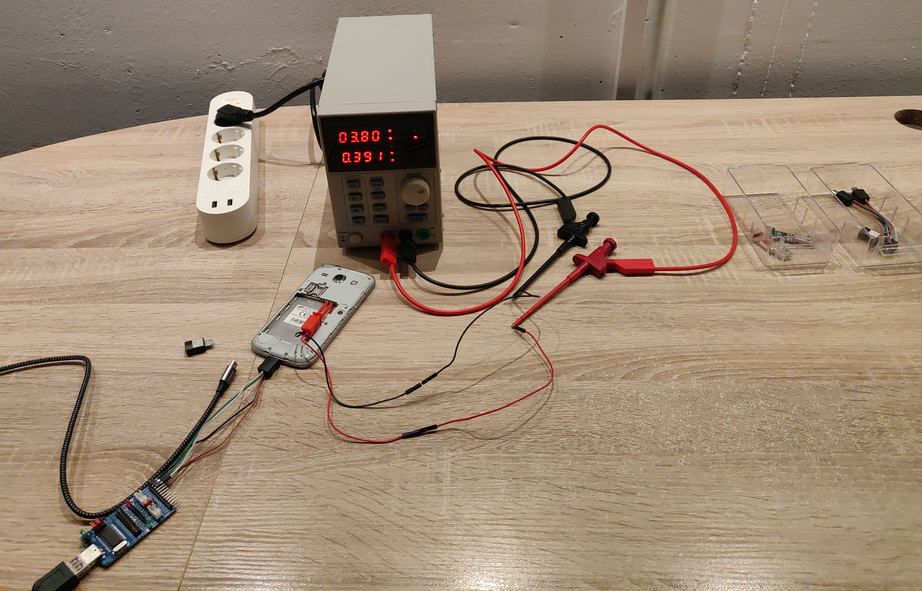
As a final act of celebration, enjoy this commemorative picture of the development setup: